So Black Dragon finally died in NA a couple times. Here are some detailed descriptions explaining about Black Dragon’s pattern and how to kill it or either contest it.
I felt like posting this, since it’s been a while since Black Dragon came out and I think I waited long enough for it to be available for everyone. I mean, it’s not really that of a secret information. Y’all can figure it out yourselves too.
Before I start, take note that (한글) shows the Korean name of the spell. This post might not be 100% accurate, but it’s safe to say this post would be helpful to a lot of you guys.
Patterns
Every 10% Boss HP triggers a pattern like the Scale Pattern or the Spirit Pattern. Before Boss starts, take Defense or Auramancy as they make you tankier and prevents you from getting one shotted easily.
The following spells are recommended to take.
- Defense: Redoubt (Life), Revitalizing Cheer (Life), Invincibility (It helps out, but not necessary.)
- Auramancy: Thwart (Mist/Stone), Shrug it off
- Movement spells. (Helpful when slowed.)
Spell Patterns
1. Typhoon Wings (태풍의 날개)
Pushes everyone away from the boss. Before casting ends, use Redoubt, Revitalizing Cheer. Invulnerable Gliders also prevent you from getting pushed away, but it is best to save this last since you want to use it when you are about to die.
One important maneuver is to place yourself so that you don’t have flame mats behind you. This helps a lot because whenever you get tripped or pushed back, you might get pushed into those flame mats if they are behind you.
2. Black Dragon Scale (검은용의 비늘) AKA. Scale Pattern
BD flies up and drops scales for a long time during cast time. Go to the dropped scales and harvest them. Once harvested, the harvester will automatically use a spell to protect up to 10 people around himself against the boss’s nuke spell that follows up.
One important thing to know is that the Harvesters must not stay close with other harvesters, because the buff goes away once they get close to each other. (Stay about 10~15m away.)
If you are contesting the Black Dragon, this pattern is the 2nd best pattern for your raid to go in. You’ll want to steal the scales to prevent the enemy raid from collecting those scales themselves.
You can harvest a scale and then go to an opposite faction player that harvested a scale to cancel their buff.
3. Smash Earth (대지 강타)
BD jumps slightly and slams the ground. You gotta glide or jump when the cast time ends. Jump at around 80% (or when you see BD coming down) of its cast time or stay glided. Even with decent gear and 40k+ HP, it’ll probably hurt you a lot, but you can easily dodge this attack!
Have multiple people calling out the pattern, so that the raid always knows that this pattern is coming.
4. Terrifying Roar (포효)
A very large AOE skill. Dragon deals nuke damage on people far away (Up to about 140m). This spell also stun everyone nearby the boss for about 6 seconds. There’s nothing much you can really do to counter this apart from Invuln gliding/mounting. This spell doesn’t usually hurt you much unless the boss gets stacks.
5. Lasso (당기기)
Lassos everyone close by towards the boss. Once lassoed the boss deals damage at the middle. You can use Shrug it Off to cancel lasso, but you will still take the damage. This damage is only lethal when BD gains stacks.
6. Penetrating Dark Energy (검은 기운의 잠식) AKA. Spirit Pattern
BD casts this spell and, after a couple seconds, unkillable spirit mobs spawn that move towards the boss. Every mob that makes it to BD gives a stack of the Devilish Contract buff. Each stack increases BD’s atk & def by 10%. This stack makes those non-lethal Lasso and Terrifying Roars lethal.
When this pattern starts, some raid members will get some black cloud on themselves. Those players can “kill” the black ghosts by going close to them. This black cloud only spawns to players in the raid that has boss aggro.
The Black cloud only spawns to the members in the raid that has BD aggro, so it is crucial to keep or steal the boss aggro.
This is the best pattern for the contesting raid to go in and kill the people with the black clouds.
THIS IS THE MOST IMPORTANT THING THOSE PEOPLE SHOULD BE DOING.
7. Sunder Earth (대지 가르기)
BD spawns an arc of blue mat in front of itself and then BD moves its right leg. After that BD deals damage on where the mat was. Just stay behind the Dragon’s legs (away from those mats) and you are fine.
8. Dark Energy Explosion (Black Bubble Pattern) (검은용의 침묵/깃털 패턴)
Boss flies up in the sky and stays there channeling. Everyone gets silenced. The only way to deal damage is to go into the Black Bubble that spawns around which gives you a casting spell and attack BD that way. When the casting ends, BD will deal nuke damage. It’s ideal if you can dodge this damage.
This pattern seems to only happen once the boss’ HP gets pretty low.
Non Spell Patterns
Spin
Standard attack. Just stay behind its leg.
Meteor
Spawns meteors. Ground will have red mat where meteors fall. Use Sonic Wave to remove burning debuff <Verify this>. Actually does have a very short cast time. (Probably like 10ms?) To reduce getting hit by meteor, your back shouldn’t be facing a fire mat because boss patterns will push you back and trip you into those fire mats.
Tremor
Uses its right leg to deal damage outwards to 5 directions.
Run Forwards
Just runs forward and then turns. EVERYONE should get behind to the boss by the time it turns. Mount up or glide up.
Fly Forwards
Takes off and flies forwards. EVERYONE should get behind to the boss by the time it turns. Mount up or glide up.
Fire Breath
Does a Fire Breath in front of the boss. Only the Tank should be at the front.
Fireball
One Fireball in front. If it hits a target, it spreads. Usually the tank that has the aggro is hit by this, so it is important for the tank to stay in front alone.
Sunder Earth behind
BD sometimes turns back and uses Sunder Earth type of skill without casting. Staying on each legs is crucial to avoid getting hit.
Good to know
Boss flies around. Always need to stay behind the boss so you have to follow the boss. Keeping Devilish Contract stack low is the most important. With high stacks, even normal hits will wipe a whole raid.
To contest BD, the best pattern to wait is the collecting Black Dragon Scale phase, or during the Penetrating Dark Energy phase, or Black Bubble phase. At 60% BD seems to get into hp regen phase. At 5% BD gains a lot of dmg/def. BD gains Frenzy once it gains enough stacks of Devilish Contract.
Honestly, if you are contesting, just make everyone go for CC tank specs and go in whenever BD does one of the major patterns. Your damage is going to be piss poor compared to BD’s skill damage anyway. Basically, once you see the BD’s hp dropping every 10% run in with an invulnerable mount and start spamming fortress, imprisons, bubbles, stillness, hell spears and the opponents should eventually get wiped by the Black Dragon’s pattern.
The advantage of doing this is that you can contest the opponent even if you have rebirth, since all you need to do is put CCs on the opponents that are under the boss.
Pattern Order
The Black Dragon 10% patterns aren’t entirely random.
Patterns that happen every 10%:
- 90% Penetrating Dark Energy
- 80% Black Dragon Scale
- 70% Penetrating Dark Energy
- 60% Dark Energy Explosion
- 60%~0% Randomly triggers “Penetrating Dark Energy”
- 50% Black Dragon Scale
- 40% No Pattern
- 30% Dark Energy Explosion
- 20% Black Dragon Scale
- 10% Dark Energy Explosion
- 5% Berserk (Regen)
Contesting using the Aggro Reset Glitch
You can easily contest the Black Dragon using the Aggro reset glitch using sleep Witchcraft skills. Spec into “Focal Concussion”. Go into the boss using an invuln mount. Hit the boss once and use Focal Concussion on the Black Dragon’s main aggro. This causes the attempting raid problems, because the main tank will not be the main aggro anymore. Healers will have problems healing the new main aggro, thus the raid easily wipes.
Assign a couple players to do this during a pattern to maximize it’s effectiveness.
Focal Concussion is banned from being used to contest bosses, so don’t do it. It’ll get fixed in upcoming patches anyway.
FOCAL CONCUSSION & NODACHI MECHANISM GOT CHANGED. NO LONGER VALID.
Advanced Knowledge
The following info will only matter to servers that are not free farming.
1. Get tag when BD spawns.
One of the best ways to ensure a quick BD kill or an easy BD contest is to ensure that your raid gets tag.
Having multiple players glide out from a high point and grabbing tag at spawn when the boss just spawned (and is still flying) is the best way to get tag. Have players mount on wyverns and use rocket gliders and stay mid air. Those players can rocket stun opponents that are also trying to get aggro as well.
Having Dragons flying around BD spawn is also very helpful, because they can use Dragon Roar to drop opponents that are on gliders trying to contest or get tag.
2. Siege Tanks are your best damage source.
Apparently Siege Damage isn’t good on BD anymore. I heard Risopodas are also not that good as they were before.
While a strong raid can simply DPS the boss down with their damage, it quickly get difficult to do so if BD gets berserk. When BD is getting multiple berserk stacks, it is still possible to kill the boss, because of the recent additions to the game. Siege Tanks and Beetle attacks completely ignore BD berserk stacks. Actively using those will eventually let the attempting raid eventually kill the boss even if there are multiple berserk stacks.
This means, as a contesting raid, having 5 or 6 berserk stacks on Black Dragon doesn’t mean Black Dragon won’t end up dying that day. Don’t be a cocky cunt and always be wary that Black Dragon can actually die.
This means the contesting raid needs to always focus on destroying enemy siege tanks. The contesting side spawning their own tanks can actually hurt the contesting side depending on how the attempting raid reacts. If the contesting side cannot control their own tanks, the attempting raid will just drive the contester’s tanks into BD and use it to DPS the boss.
Having multiple beetles also helps killing the boss significantly. To contest this, you need all of your archers using Basic Missile Rain to kill the beetles as well as having players to spec Gunslinger’s Collateral Damage to quickly destroy tanks.
3. Resetting Black Dragon is not easy.
While many of you might think the opposite, if the attempting raid has a significantly stronger raid, it is very difficult to reset Black Dragon. Hear me out. There are two ways to reset BD: grab aggro and drive it outside of its zone, or to wipe the enemy raid and have everyone in the raid to drop aggro. The latter option is difficult to achieve if the enemy raid is strong. This also gets even more difficult when there are multiple siege tanks spawned.
If the contesting raid grabs aggro when the boss has less than 60% of its HP, the contesting raid must almost always work on resetting the boss.
Shit can likely go south up to the point that you won’t be able to reset the boss and eventually the more determined attempting raid will whittle the boss down with siege tanks and beetles.
4. Hero Respawns is the most powerful addition for the attempting raid.
Since the addition to Hero Respawns, it is much more easier for the attempting raid to kill BD. Not to mention the addition of beetles and the buff to siege tanks makes killing BD really a joke. Don’t waste your hero respawns on a petty Jola, Meina, Glenn. Use it for Black Dragon. Obviously over time, the heroes will know how many they will need to spare for Black Dragon.
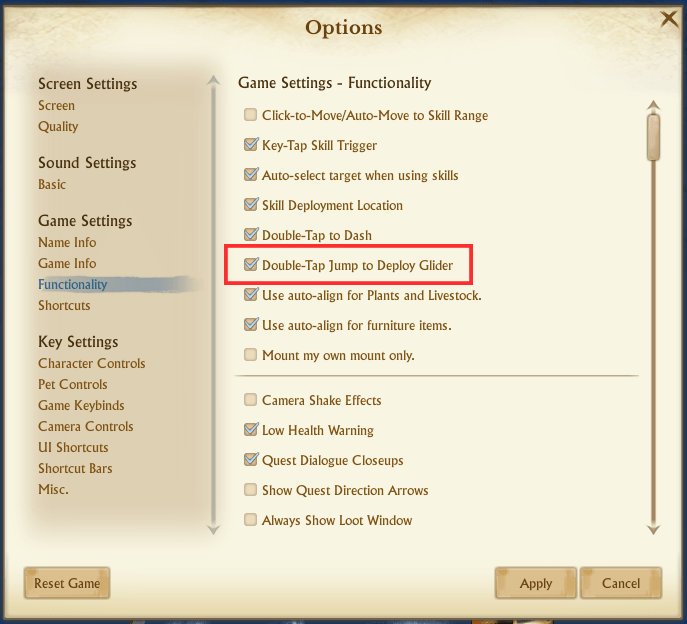
5. Enable “Double-Tap Jump to Deploy Glider” for Smash Earth.
Dodging Smash Earth pattern with a jump can be finicky.
There are times you won’t have much time to react when Smash Earth happens.
By enabling this setting, you can easily dodge the boss pattern. Just make sure you’re away from other people because you can get knocked out of your glider by other players.
TL; DR
It is much more easier for the attempting raid to kill Black Dragon with the addition of Hero Respawns, Beetles, and Siege Tank buffs.
The attempting raid must always prioritize on the patterns and focus on DPSing the boss with siege tanks. (At least when the boss has multiple berserk stacks.) Prioritize on keeping boss aggro and having it stay at the center. Zombie rush into the boss to eventually whittle it down.
The contesting raid must always prioritize on resetting the boss whenever they can. The boss literally doesn’t regen, so a brain dead faction with a fuck ton of bodies and beetles and tanks can literally zombie rush the boss to death even with zero gear.
![[3/5/2020] The Ipnysh Sanctuary](https://dpain.dev/wp-content/uploads/2020/02/golden_shrine_dungeon.jpg?w=924&h=0&crop=1)