Got some Ipnysh Sacntuary (Golden Shrine) boss videos that you guys might be interested in. The 2nd boss and the 4th boss are the hard ones with the 2nd boss being the hardest.
Thanks to Kimnuts for making the videos that I referenced to write up the guide!
2nd Boss
Ah I guess you finally beat the first bosses. Now its Luxior and Umbrael that you need to kill.
Party Composition
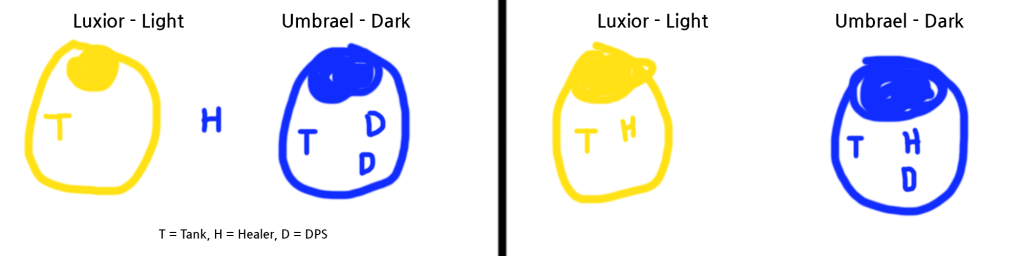
In Kimnut’s video, the party has 2 healers, 3 archers. 2 of the archers have shields and specced Defense. Lulu’s video runs 2 tanks, 1 healer, and 2 DPS. Having 1 dedicated DPS with 2 healer adds more stability to the attempt, but slows down the run. Having 2 dedicated DPS with 1 healer speeds up the process, but adds more burden to your healer and it get harder to recover (harder to revive dead people).
I personally prefer a 2 tank (that also can dps), 2 healer, 1 dps party composition, but you can also beat this pretty easily with a 2 tank, 1 healer, 2 dps party. It just requires a different way to approach the boss. As long as your party members aren’t monkeys, the 1 healer comp will work better, because you’ll have more damage for the last boss. (More DPS helps.)
Buffs and Debuffs

The first debuff is the timer till it hits Enrage mode. When the boss is in enrage, you basically can’t beat it, because it gains 300% increased damage and 80% received damage. Just reset at the point.
The first buff is the type of the boss. The first buff shows your the type the boss is. Light Warden Luxior is light type and Shadow Warden Umbrael is dark type. If you get hit by the boss with the same type as yourself, you will only receive 1/3 of the actual damage. You also need the same type to react on a specific boss pattern. So it’s important to have two players tanking each of the bosses.
The 2nd buff is the amount of shield the boss has. Both bosses start with 10k shield. If you hit the boss when the shield is present, you “get” the same type the boss has. The tanks must each get the light and dark type. This means one of your tank needs to tank the light type and the other tank needs to tank the dark type. What types should the DPS get? It really depends on your party.
Either 1 tank be alone with 1 type and the rest can all be on the other type. Another option is to have 1 tank and 1 healer pair up to have the same type and the DPS can be on either type. There’s advantages and disadvantages on both situations.
First of all, there is a pattern that makes the boss teleport randomly to anyone with the same type. If the tank is the only one with, for example, a light type, the Luxior will always teleport to the tank, and shoot auras to the tank. This makes the tank’s life easier, because there are going to be less unexpected situations happening, and Luxior will have less mettle stacks, which makes it easier for an inexperienced tank. Another option available is to have 1 tank and 1 healer pair up and the DPS get any type. This helps the tanks get consistent heals, because the healer will always be close to the tanks, and will help 2 inexperienced healer keep their tanks up. It really depends on your party.
I personally like having 1 tank stay alone and have the rest DPS one boss at a time.
The boss skills are the following:
Luxior’s Skill Patterns
Horizontal Strike
When Luxior uses this skill, the boss moves forward slightly. You need to pay attention so that the boss’s skill doesn’t hit your back, since the skill wouldn’t get blocked and will kill the tank.
Cross Quake
The Cross Attack’s cross mat is very large and can reach from one end to almost the other end so both tanks should be aware of this. Once the scale pattern happens, Cross Quake starts creating a star shaped mat instead of a cross one, so players must be careful where they stand.
The best way to dodge this skill is to move back a bit and look at the mat from the top (example shown above) and move out of the mat.
Summon Light
Once the shield of the boss is gone, the boss enters the 2nd phase and will start be using this skill.
After the first skill channel, it will teleport to the main aggro. Every player with the same type needs to get close to the boss before this first channel ends or they will get hit by a purple Damage over Time attack that lasts for 10 seconds when the 2nd skill channel ends. This DoT damage hurts and prevents people from rezzing the dead, so everyone needs to pay attention to this.
If you fail and get the DoT damage, your healer should use mana barrier to keep the players with the DoT tick safe.
TL; DR: Players with the same type of the boss MUST get close to the boss or said players will gain 200% reduced healing. and DoT damage.
Vertical Strike
Like Horizontal Strike, you want to back up slightly.
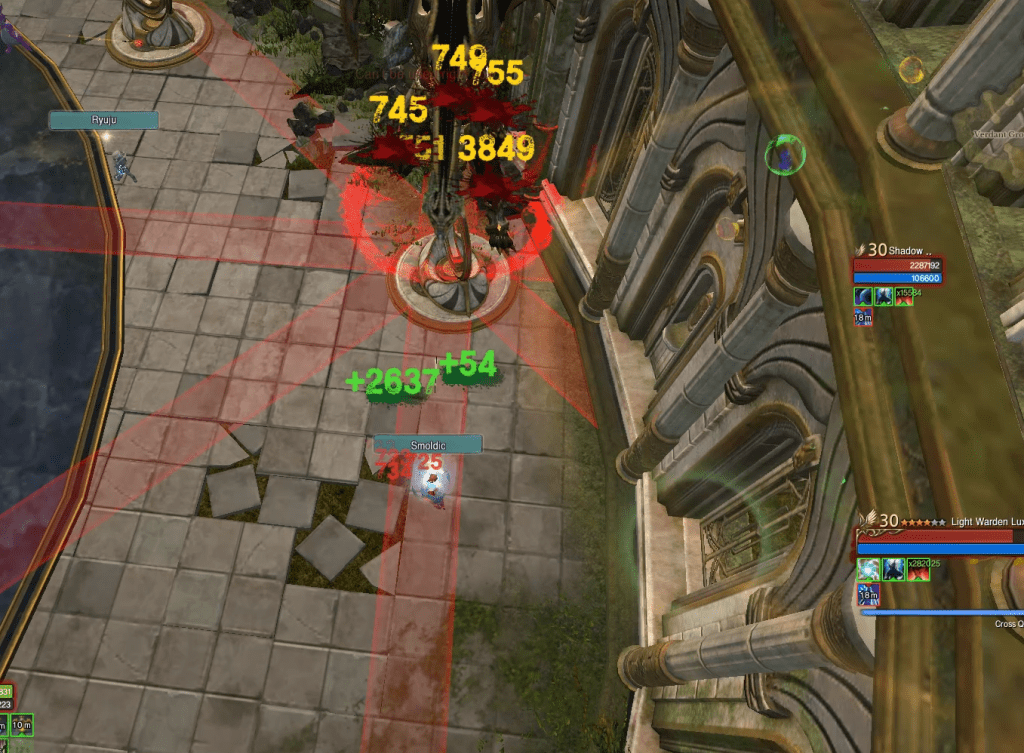
Luxior’s Aura
When Luxior’s Aura happens, It randomly chooses someone who has the same type as the boss and shoots a light ball. When the light ball hits the target, it spawns a circle aura on the floor that deals damage to people in it. You can prevent the aura from spawning by getting hit by it while you are on the window shown above. Umbrael’s Aura is identical to this skill pattern. You can see what happens if the aura actually spawns in the Umbrael’s Aura section.
Chasing Lights & Cleanse Umbrael’s Aura
After the first channel ends, Luxior randomly teleports to a player with the same type and later on cleanses Umbrael’s dark Auras that are towards the temporarily aggroed player. If you need to remove Umbrael’s Auras, the main aggro can move in front of an Aura so that Luxior can remove the aura. An example is shown above. Notice that the Shadow Aura disappears after the boss uses the skill.
Umbrael’s Skill Pattern
Umbrael seems easier to tank than Luxior, because Umbrael doesn’t move around while attacking unlike Luxior.
Impaling Strike
This is basically Umbrael’s version of Horizontal Strike. This skill can be blocked and you always want to get hit by the skill (still should block it), because this is the weakest skill. Once Umbrael uses this skill, it will consume its Mettle stack to deal increased damage (like how Luxior does with Horizontal Strike.)
Shadow Orb
Consider this Umbrael’s version of vertical strike. You also want to get hit by this instead of dodging them, because it’s also one of the more weaker skills.
Lightning Strike
The Lighting Strike attack will hit players close to the boss or the players that doesn’t have the Light type. It’s easy to dodge, so dodge it! Just make sure dodging takes higher priority than finishing your channeling of a skill.
Summon Shadows
After the first channel, it randomly teleports to one of the players with the same type. After the 2nd channel, it gives a purple Damage over Time attack that lasts for 10 seconds to everyone except the Tanks like Summon Light. Your DPS and healer should be close to each other and the healer should use Mana Barrier to prevent from dying from this. If you have the Dark type and don’t get close to Umbrael like how I did in the example above, you’ll get 200% reduced healing, so the only way to keep yourself safe from it would be using Mana Barrier.
Umbrael’s Aura

After channel finishes, the boss shoots a big purple orb that randomly chases one of the players with the same type. When it hits the player, it spawns Umbrael’s Aura on the ground that you want to stay out of. I didn’t do it in the 1st example, but if you jump on top of the window pane on the side and get hit by the orb, the Aura will not get spawned on the ground. (Check 2nd example.)
Chasing Shadows & Cleansing Luxior’s Aura
These 2 skills are a pair. After teleporting to a random player with dark type, Umbrael starts erasing Luxior’s Auras that are on the ground close by the Umbrael. It’s helpful to use this to remove any Luxior’s Aura that are nearby.
Shadow Beam
This pattern is a bit tricky. As soon as the boss channels Shadow Beam, it spawns a rotating beam around its staff that players need to avoid. This beam is pretty long so if the two bosses are close, the other tank also had to be careful. Best way to counter this is to call out Shadow Beam as soon as you see the cast. and get ready to dodge it. If you can’t dodge it, run towards the beam and jump to avoid it. The last resort is to use invincibility.
If you get hit by it, you get a skull debuff and you get slowed for 20 seconds and get DoT ticks. This hurts, so do your best to not get hit by the beam.
Scale Pattern
After phase 1 where the boss loses it’s shield, it can do the so-called “Scale Pattern.” One of the bosses randomly teleports to the center of the room and on scales located on the left and right side of the room light up. The location of the dark and light type are random, which means the dark type can either all spawn on the left side or all spawn on the right side of the room. In the example above, I am tanking the light boss and the light scales were on the other side of the map, so I had to run all the way there.
As soon as the scale pattern happens, you want to locate your scale and activate it. If you fail to do so, you get hit by a DoT skill by the bosses. Tanks should have top priority on getting the closest scale, then it should be the healers that gets the closer scales (Since its easy to revive a dead DPS).
Once the scale pattern ends, your type swaps. Light becomes dark and dark becomes light. (People without type stay type-less will always get hit by the DoT skill.) This means that the tanks are going to swap and tank the opposite boss after the scale pattern. You’ll see me tanking the Light boss and swap to tanking the dark boss in the example above.
Tips about Boss Type and DPS
Until the the tank gains enough aggro, the extra DPS shouldn’t be hitting the bosses. We can’t see it in the video, but you can notice that the extra DPS does get an attack type by hitting a boss, before the boss loses its shield.
Regardless of the party composition, seems like it’s best to have all the party get the same type except the ones tanking. For example, 4 players will get light type and 1 tank will get the dark type.

Key Points to beat the bosses:
DPS and do the patterns until both bosses has 5% HP (265,000 HP) left. To be safe, slow DPS when you get close and avoid AOE skills. When a boss hits 5% HP, it will go into sleep mode that heals the other boss up to 30% hp. You want both bosses entering sleep mode and burn both of them at the same time. Check the example below on how this works.
Basically all of the bosses’ attacks hurt, but the tanks need to get hit by the skills called “Horizontal Strike” and “Impaling Strike”. They are kind of like the bosses’ basic attacks. The reason behind this is whenever the tank dodges those skills, the boss gains a buff stack called ” How dare you dodge this? (어쭈 피해?)” that increases the boss’s received damage and damage by 30%.
Also the bosses gain Mettle stacks whenever it is hit and “Horizontal Strike” and “Impaling Strike” both deals consumes the Mettle stacks to deal extra damage. When the attack is blocked, 100k Mettle stacks seem to deal 10k more damage.
If your party members have big dick damage, but your tanks aren’t that tanky, your party needs to slow down DPS. Bosses with too high Mettle stacks can kill tanks that aren’t fully equipped to tank.
Luckily attacks from the bosses can be blocked, parried, and evaded, so the 2 tanks need to spec Defense with a shield and use Gale Shield Slam whenever available to dodge the bosses’ attacks. With block, the hits are manageable.
Because the boss starts with 10k shield at the start, (The video shows 50k due to it being done before the nerf.) the tanks can’t keep aggro from the healer. It’s important for the tank to use hard aggro skills like “Boastful Roar” and “Mocking Howl” to keep it from aggroing to the healer. It’s also important to make the boss face towards the wall so that it won’t accidentally hit other players.
Pro tip: You can notice that the main tank archer swapped to normal Endless Arrow. This is probably to prevent the GCD so that he can use his defense skills on time.
The End Game (Killing the Bosses)
DPS both bosses down to 10% HP. Then, slowly chip down both bosses down to 5% HP. Do not use your nuke skill combo right now, because you will need to use that on the 2nd boss. Once one of the bosses gets stunned by reaching 5% HP, everyone needs to immediately go to the other boss and DPS the boss down before it heals the stunned boss. This example was when we first killed the bosses, so you’ll notice us DPSing the first boss down to 3% HP, but this is not needed.

This guide provides helpful insights into party composition for tackling these bosses.
LikeLike