Charybdis Patterns

Easiest boss in the world.

Intro

Charybdis boss is finally out. It’s an easy boss to kill, because it is very difficult to reset it. It spawns North East of Aegis Island on Thursdays and Sundays at 9:30PM EST (10:30PM EDT).

I had this post written a long time ago, but it’s finally public now.

Since it is very difficult to reset the boss, it is important to get the tag on the boss.

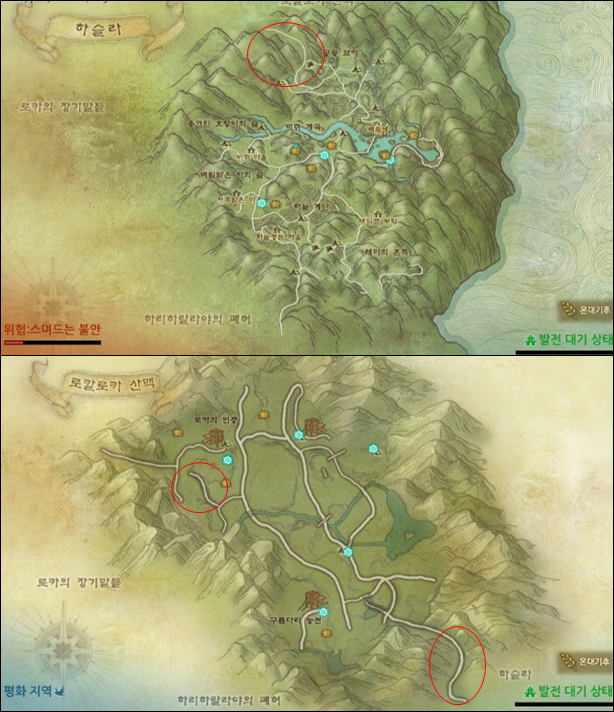
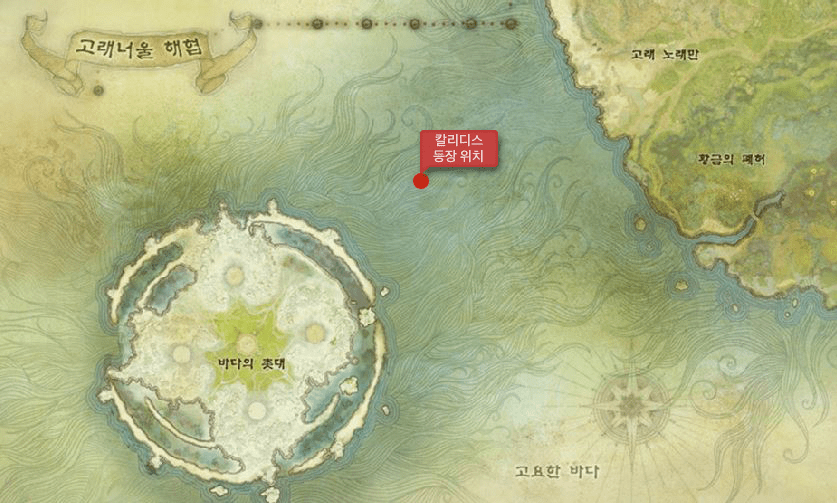
The spawn location is marked below with the red dot.

The coordinates for Charybdis is: W 5’54’ 5″, S 1’3′ 45″. (Double check please.)

Red dot is where Charybdis spawns.

It drops Charybdis gear by chance and always drops a trip gem as well as mats required for crafting a Charybdis gear and mats required for awakening raid boss gear.

If you want to kill this boss even with enemies contesting you, for fuck sake, spec defense when I’m telling you right now and focus on the objectives instead of fighting your enemy. Have a couple boats shooting the boss at all times so that, even if a boat sinks, your raid will still have other boats shooting on the boss to prevent it up resetting.

Patterns

Charybdis Patterns: Seems like most non aoe spells just targets the main aggro.

  1. Dahuta’s Curse (다후타의 저주): After casting Dahuta’s Curse, everyone except the boat captains get a blue effect debuff and must go in water to get rid of the debuff. After some time, people with the blue effect gets dealt damage. Failing to remove this debuff spawns the Ghost NPC. Ally Ghost NPC interferes with boat movements and heals players and boats when interacted. Enemy Ghost NPCs also interferes movements. Both ally and hostile ghosts will get absorbed by Charybdis during the absorption pattern, and reduces boss stacks and must be killed or interacted.
  2. Water Cannon (물대포): Boss tilts to one direction and shoots water. Drinks water first during casting and turns anti-clockwise 90′ and shoots it.
  3. Uppercut (올려치기): Dives into the water momentarily and causes a whirl around which causes boats to get pulled around. This is why Turtle boats are great. Enoans are somewhat okay because they move less.
  4. Body Slam (몸통 내려치기): After finishing cast, boss tilts to one direction and then slams to opposite direction. Seems to always attack the aggro target. By non-stop driving the boat, boats can dodge the attack.
  5. Howling (하울링): Just some random attack spell?
  6. Raksha (라크샤): A Levi-like mob appears temporarily and eats the boat and flies to the sky. This can happen any time once the boss’ HP drops lower to a certain threshold. A red effect pops up in the water and a Levi-like mob follows the red effect and one-shots the boats close to the aura that have low hp (Hunts boats if the boat’s HP drops to lower than approximately 50% of the its max HP).
  7. Hunting (먹이사냥): During casting, it shoots a circle sonic beam toward its’s target. Once casting is over, it attacks its target. Doesn’t seem to drag it though.
  8. Sea of Death (죽음의 바다): Kills everyone who is in the water. Stay on boat or use invincibility mount/glider/skill. (This is a guaranteed cast after Dahuta’s Curse) After casting, it creates a God’s Whip visual and instantly kills players. Can also be randomly casted.
  9. Spit (뱉어내기): Spits out green stuff. I think it just does poison damage. Nothing important.

Extra Info:

  • At 10% the boss gets Enraged buff. (50% dmg increase and hp regen) This buff only happens once and doesn’t happen again which means the boss will never regen again while it has aggro.
  • Rule of thumb is to staying away at least 45m away from the boss while constantly moving. This helps avoiding patterns and boats would be less likely to collide with each other.
  • Charybdis Dahuta’s Curse Stack: Starts with 100 stacks. The less stacks Charybdis has, the stronger the boss becomes.
  • When Dahuta’s Curse has lower than 40 stacks, damages hit for 30k~40k and becomes like an instant kill mechanic like Sea of Death.

Stacks

So there’s two types of Ghost NPCs.

Ally Ghost NPCs spawn close to the main raid that aggro-ed the boss. If you purify these NPCs, it heals nearby allies and ally boats. These NPCs are a nuisance, because they block boats from moving freely and can trap boats.

Targettable Enemy Ghost NPCs (They don’t attack though.) also exist and spawn around enemy contesting players.

Charybdis uses a skill (Soul Absorption) every so often that absorbs these ally and hostile enemy ghost NPCs. Each ally or hostile ghost reduces Dahuta’s Curse stack from Charybdis which makes the boss stronger. So you need to do your best to interact with the ally ghost NPCs and kill the hostile ones if you are trying to kill Charybdis.

When the boss resets, this stack doesn’t immediately go back to 100, but it eventually does reset back to its original 100 stack.

Killing the Boss

As long as you have enough boats and people with an actual non-decorative brain, killing Charybdis is very – and I repeat – very easy. The boss is very difficult to reset, because the boss is stationary. It has no chasing mechanic like Kraken, so as long as, at least 1 person in the whole fucking raid is aggroed to the boss, Charybdis will never reset. Doesn’t even have to be siege damage, just hit the boss to keep the aggro.

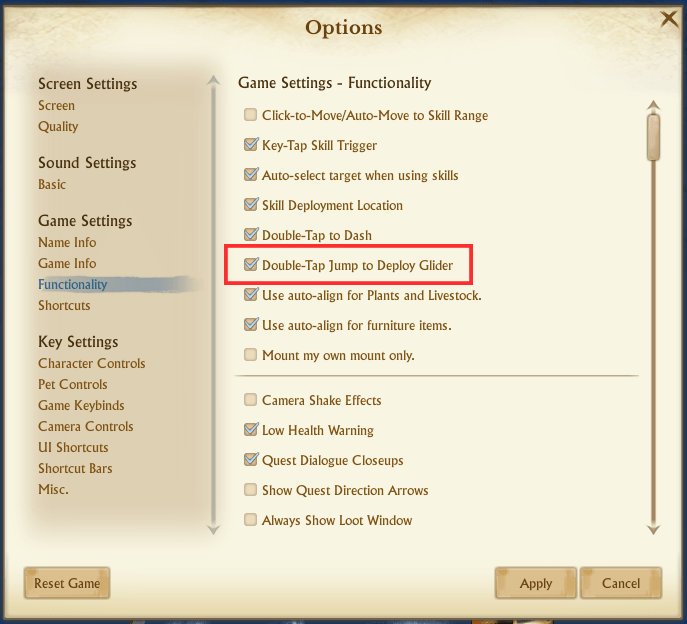
Don’t spec sooth. You’re god damn useless. The respawn Nui is right next to the boss. If you specced Soothsayer, you literally wasted a skill class that could’ve been either Auramancy or Defense which are great for survivability or mobility. With Sooths in the raid, people are also not going to respawn right away after they died. This makes them have to wait longer for their rebirth to wear off. You are the ones that are fucking up the whole raid.

Spec Defense. Even the most talented players benefit off of invincibility when they are in the water during Sea of Death. And I know there’s a bunch of washed up players that think they are too cool to spec Defense.

This boss is a fucking PVE boss. Stop wandering around to kill people. Get 2~3 boats ready for each driver and just ignore the contesting raid. Non-stop dps the boss and have a group of players to kill the hostile Ghost NPCs. Always interact with ally NPCs whenever you have the opportunity. Do not PVP. It’s pointless. A competent raid is going to have players constantly hitting the boss and eventually this boss will die, because, I mean, it only regens once.

When a boat dies, just rotate through your other boats. By the time your last boat dies, you’ll have your first boat up.

Get Strength of the Faction for shorter Rebirth timer.

Contesting the Boss

Uhh good luck. Do your best to ram all the boats.

You could also actively kill the players that are trying to kill your ally Ghost NPCs (Hostile to the attempting raid.) That way, you can reduce the boss’ stacks to make every hit one shot players.

Ideal play is to tag the boss on spawn and literally just keep it your tag.

Equipment Subtype Levels

Previously known as Gear Specialization Levels

So… I’ve done snippets of translations regarding the Garden update which includes the new Gear Specialization feature, but this is some details explanation with numbers involved 😃 I’ve been calling this Gear Specialization Levels before, but umm Gamigo decided to call it Equipment Subtype Levels so I’ll call it that way from now on.

Intro

XL released the Garden Update a while ago and it is the update which NA/EU will be getting next. The Garden patch is probably one of XL’s most ambitious patches ever, since it introduces a cross server region.

Apart from introducing a new region, they also added new tiers for Hiram gear and Erenor gear! Hiram gets T5 (Exalted) and Erenor gets T3 (Brilliant). (After the Garden Patch, yall would’ve noticed that Library now got T3 as well.)

Unlike the T3 Library gear that is added later into the game, T5 Hiram and T3 Erenor doesn’t really get much of a buff in stats or damage initially. The cool thing though is that T5 Hiram, T3 Erenor, T2 Library gear all gets a new feature called Equipment Subtype. This applies to both Weapon and Armor.

Basically these extra levels increases your gear’s strength against its counterparts. For example, if you level up your bow’s subtype level, the bow will hit harder against cloth players. If you level up your cloth gear’s subtype level, bow attacks will basically hurt less.

At level 10, it has been reported that you would have a DPS increase of 10~20%. Not sure how much armor levels would affect that yet, since these were tests users did by themselves.

Max Levels for each Gear Type

Each gear all have different max enhancement level it can reach and here are the following: (I don’t know what the levels for T3 Library weapons will be. Tbh, no one should use it anyway.)

XL mentioned eventually players will be able to max level up the enhancement level for the gears that don’t go up to 4, 10 (mythic, eternal respectively)

Gear

Weapon

Armor

Mythic

Eternal

Mythic

Eternal

T5 Hiram

4

10

2

5

T3 Erenor

4

10

2

5

T2 RD

4

2

T1 Levi

T1 Charybdis

T2 Lib

T3 Lib (Immortal Warden)

TBD

TBD

2

5

T2 BD

4

10

2

5

T2 Levi

T2 Charybdis

T2 Anthalon

Leveling Tab UI

Imagine Feeding Eternal Erenor Infusions 🤮

Leveling Gear Specialization Levels require you to consume existing experience points from your gear. You can’t feed experience in a way it will lower your gear’s item grade (Eternal -> Mythic), so you will have to feed Eternal Erenor Infusions to your Eternal Erenor gear or Mythic Erenor Infusions to your Mythic Erenors. Uhh…. Good luck with that. You can always feed staves and shit if you can afford it.

Luckily for Hiram and Library gear, you can just feed the gear with existing infusions into your gear. The catch is that it requires way more experience than Erenor.

Damage Type VS Armor Type

Attack Speeds are written in parenthesis. The damage type for each weapon are the following:

  • Piercing: Bow(1.0)
  • Slashing: Dagger(0.8), Sword(1.0), Katana(1.0), Nodachi(1.1), Greatsword(1.1), Shortspear(1.1), Longspear(1.2)
  • Crushing: Axe(1.1), Greataxe(1.2)
  • Blasting: Sceptor(1.0), Staff(1.3)
  • Bludgeoning: Club(1.2), Greatclub(1.3)
Armor TypeSlashingCrushingBludgeoningBlastingPiercing
ClothLowNoneMedium HighNoneHigh
LeatherHighMediumMedium LowLowNone
PlateNoneMediumNoneHighLow
The bludgeoning type and blasting type is newly added.

Clubs and Greatclubs have bludgeoning damage/heal type which means it will heal players that are wearing Cloth and Leather more, but not for players wearing Plate.

Erenor Required EXP per Level

Here’s the required amount of EXP per each Level for Erenor. It is the same for both Mythic and Erenor.

Weapon:

  1. 311
  2. 622
  3. 933
  4. 1244
  5. 1555
  6. 1866
  7. 2177
  8. 2488
  9. 2799
  10. 3110

Total EXP: 17105.

Armor:

  1. 233
  2. 466
  3. 699
  4. 932
  5. 1165

Total EXP: 3495.

The amount of gold required to leveling up varies. It’s hard to find exact numbers, because no one cared to post it, but it seems like the cost ranges from the hundreds to the thousands. I don’t have info about the exact numbers for the labor cost and gold cost, but I mean if you’re aiming to level up Erenor gear, the amount of labor and gold required for each level are the least of your concerns.

It’s pretty difficult to take advantage of leveling up an existing Erenor gear at Mythic up to 4 (since that is the max level at Mythic) and then synthesizing it to Eternal to max it to level 10, because – uhh… – it’s pricey to get a Mythic Erenor at high exp %, but if you are able to achieve that, you can save some gold by doing so.

Basically if you take the staff route to level up Erenor gear, after feeding 6 leggy staves, awaken the Erenor to T3. Level 2 of your subtype levels. Feed Mythic Erenor crate exp/Mythic staves/Mythic crafted infusions and aim to roll over 2796 mythic exp so that you can use mythic exp to level your gear all the way to level 5.

Hiram Required EXP per Level

I got this info from KR inven: http://m.inven.co.kr/board/archeage/2836/279641
Here are the EXP required for Hiram at each level.

Level

Weapon

Armor

EXP

Labor

Gold

EXP

Labor

Gold

1

372,339

550

500

219,484

220

250

2

744,678

600

750

438,968

240

375

3

1,117,017

650

1,000

658,452

260

500

4

1,489,356

700

1,250

877,936

280

625

5

1,861,695

750

1,500

1,097,420

300

750

6

2,234,034

800

1,750

7

2,606,373

850

2,000

8

2,978,712

900

2,250

9

3,351,051

950

2,500

10

3,723,390

1,000

2,750

Total

20,478,645

7,750

16,250

3,292,260

1,300

2,500

Immortal Warden Required EXP per Level

Got this from KR inven as well:
http://m.inven.co.kr/board/archeage/2641/13961
Here are the EXP required for Immortal Warden at each level

Level

Weapon

Armor

EXP

Labor

Gold

EXP

Labor

Gold

1

TBD

TBD

TBD

109,473

220

250

2

TBD

TBD

TBD

218,946

240

375

3

TBD

TBD

TBD

328,419

260

500

4

TBD

TBD

TBD

437,892

280

625

5

TBD

TBD

TBD

547,365

300

750

6

TBD

TBD

TBD

7

TBD

TBD

TBD

8

TBD

TBD

TBD

9

TBD

TBD

TBD

10

TBD

TBD

TBD

Total

TBD

TBD

TBD

1,642,095

1,300

2,500

Quick Facts

  • The EXP required for 1H is equivalent to a 2H.
  • Armor pieces cost the same regardless of what piece it is. (The amount of GS you gain per piece are different though.) For example, a chest piece gain more GS than a glove piece.
  • Leveling a gear from 1 to 2 is the same as leveling a gear from 4 to 5, leveling each of your gear one by one instead of trying to max level 1 piece at a time.
  • Level up Weapon first or Armor first? WEAPON FIRST. There’s a bunch of explanation here: http://www.inven.co.kr/board/archeage/2641/13886
    I’m lazy so just believe me. For healers who overheal, sure, go for armor first.
  • Apart from the static cost for leveling, The amount of exp consumed also costs you gold. For Immortal Warden gear, from level 1~5, it will roughly cost you 10k gold for each piece. The cost varies depending on the type of gear. (Eg. Costs more for chest piece.)

Black Dragon Patterns

So Black Dragon finally died in NA a couple times. Here are some detailed descriptions explaining about Black Dragon’s pattern and how to kill it or either contest it.

I felt like posting this, since it’s been a while since Black Dragon came out and I think I waited long enough for it to be available for everyone. I mean, it’s not really that of a secret information. Y’all can figure it out yourselves too.

Before I start, take note that (한글) shows the Korean name of the spell. This post might not be 100% accurate, but it’s safe to say this post would be helpful to a lot of you guys.

Patterns

Every 10% Boss HP triggers a pattern like the Scale Pattern or the Spirit Pattern. Before Boss starts, take Defense or Auramancy as they make you tankier and prevents you from getting one shotted easily.

The following spells are recommended to take.

  • Defense: Redoubt (Life), Revitalizing Cheer (Life), Invincibility (It helps out, but not necessary.)
  • Auramancy: Thwart (Mist/Stone), Shrug it off
  • Movement spells. (Helpful when slowed.)

Spell Patterns

1. Typhoon Wings (태풍의 날개)

Pushes everyone away from the boss. Before casting ends, use Redoubt, Revitalizing Cheer. Invulnerable Gliders also prevent you from getting pushed away, but it is best to save this last since you want to use it when you are about to die.

One important maneuver is to place yourself so that you don’t have flame mats behind you. This helps a lot because whenever you get tripped or pushed back, you might get pushed into those flame mats if they are behind you.

2. Black Dragon Scale (검은용의 비늘) AKA. Scale Pattern

BD flies up and drops scales for a long time during cast time. Go to the dropped scales and harvest them. Once harvested, the harvester will automatically use a spell to protect up to 10 people around himself against the boss’s nuke spell that follows up.

One important thing to know is that the Harvesters must not stay close with other harvesters, because the buff goes away once they get close to each other. (Stay about 10~15m away.)

If you are contesting the Black Dragon, this pattern is the 2nd best pattern for your raid to go in. You’ll want to steal the scales to prevent the enemy raid from collecting those scales themselves.

You can harvest a scale and then go to an opposite faction player that harvested a scale to cancel their buff.

3. Smash Earth (대지 강타)

BD jumps slightly and slams the ground. You gotta glide or jump when the cast time ends. Jump at around 80% (or when you see BD coming down) of its cast time or stay glided. Even with decent gear and 40k+ HP, it’ll probably hurt you a lot, but you can easily dodge this attack!

Have multiple people calling out the pattern, so that the raid always knows that this pattern is coming.

4. Terrifying Roar (포효)

A very large AOE skill. Dragon deals nuke damage on people far away (Up to about 140m). This spell also stun everyone nearby the boss for about 6 seconds. There’s nothing much you can really do to counter this apart from Invuln gliding/mounting. This spell doesn’t usually hurt you much unless the boss gets stacks.

5. Lasso (당기기)

Lassos everyone close by towards the boss. Once lassoed the boss deals damage at the middle. You can use Shrug it Off to cancel lasso, but you will still take the damage. This damage is only lethal when BD gains stacks.

6. Penetrating Dark Energy (검은 기운의 잠식) AKA. Spirit Pattern

BD casts this spell and, after a couple seconds, unkillable spirit mobs spawn that move towards the boss. Every mob that makes it to BD gives a stack of the Devilish Contract buff. Each stack increases BD’s atk & def by 10%. This stack makes those non-lethal Lasso and Terrifying Roars lethal.

When this pattern starts, some raid members will get some black cloud on themselves. Those players can “kill” the black ghosts by going close to them. This black cloud only spawns to players in the raid that has boss aggro.

The Black cloud only spawns to the members in the raid that has BD aggro, so it is crucial to keep or steal the boss aggro.

This is the best pattern for the contesting raid to go in and kill the people with the black clouds.

THIS IS THE MOST IMPORTANT THING THOSE PEOPLE SHOULD BE DOING.

7. Sunder Earth (대지 가르기)

BD spawns an arc of blue mat in front of itself and then BD moves its right leg. After that BD deals damage on where the mat was. Just stay behind the Dragon’s legs (away from those mats) and you are fine.

8. Dark Energy Explosion (Black Bubble Pattern) (검은용의 침묵/깃털 패턴)

Boss flies up in the sky and stays there channeling. Everyone gets silenced. The only way to deal damage is to go into the Black Bubble that spawns around which gives you a casting spell and attack BD that way. When the casting ends, BD will deal nuke damage. It’s ideal if you can dodge this damage.

This pattern seems to only happen once the boss’ HP gets pretty low.

Non Spell Patterns

Spin

Standard attack. Just stay behind its leg.

Meteor

Spawns meteors. Ground will have red mat where meteors fall. Use Sonic Wave to remove burning debuff <Verify this>. Actually does have a very short cast time. (Probably like 10ms?) To reduce getting hit by meteor, your back shouldn’t be facing a fire mat because boss patterns will push you back and trip you into those fire mats.

Tremor

Uses its right leg to deal damage outwards to 5 directions.

Run Forwards

Just runs forward and then turns. EVERYONE should get behind to the boss by the time it turns. Mount up or glide up.

Fly Forwards

Takes off and flies forwards. EVERYONE should get behind to the boss by the time it turns. Mount up or glide up.

Fire Breath

Does a Fire Breath in front of the boss. Only the Tank should be at the front.

Fireball

One Fireball in front. If it hits a target, it spreads. Usually the tank that has the aggro is hit by this, so it is important for the tank to stay in front alone.

Sunder Earth behind

BD sometimes turns back and uses Sunder Earth type of skill without casting. Staying on each legs is crucial to avoid getting hit.

Good to know

Boss flies around. Always need to stay behind the boss so you have to follow the boss. Keeping Devilish Contract stack low is the most important. With high stacks, even normal hits will wipe a whole raid.

To contest BD, the best pattern to wait is the collecting Black Dragon Scale phase, or during the Penetrating Dark Energy phase, or Black Bubble phase. At 60% BD seems to get into hp regen phase. At 5% BD gains a lot of dmg/def. BD gains Frenzy once it gains enough stacks of Devilish Contract.

Honestly, if you are contesting, just make everyone go for CC tank specs and go in whenever BD does one of the major patterns. Your damage is going to be piss poor compared to BD’s skill damage anyway. Basically, once you see the BD’s hp dropping every 10% run in with an invulnerable mount and start spamming fortress, imprisons, bubbles, stillness, hell spears and the opponents should eventually get wiped by the Black Dragon’s pattern.

The advantage of doing this is that you can contest the opponent even if you have rebirth, since all you need to do is put CCs on the opponents that are under the boss.

Pattern Order

The Black Dragon 10% patterns aren’t entirely random.

Patterns that happen every 10%:

  • 90% Penetrating Dark Energy
  • 80% Black Dragon Scale
  • 70% Penetrating Dark Energy
  • 60% Dark Energy Explosion
  • 60%~0% Randomly triggers “Penetrating Dark Energy”
  • 50% Black Dragon Scale
  • 40% No Pattern
  • 30% Dark Energy Explosion
  • 20% Black Dragon Scale
  • 10% Dark Energy Explosion
  • 5% Berserk (Regen)

Contesting using the Aggro Reset Glitch

You can easily contest the Black Dragon using the Aggro reset glitch using sleep Witchcraft skills. Spec into “Focal Concussion”. Go into the boss using an invuln mount. Hit the boss once and use Focal Concussion on the Black Dragon’s main aggro. This causes the attempting raid problems, because the main tank will not be the main aggro anymore. Healers will have problems healing the new main aggro, thus the raid easily wipes.

Assign a couple players to do this during a pattern to maximize it’s effectiveness.

Focal Concussion is banned from being used to contest bosses, so don’t do it. It’ll get fixed in upcoming patches anyway.

FOCAL CONCUSSION & NODACHI MECHANISM GOT CHANGED. NO LONGER VALID.

Advanced Knowledge

The following info will only matter to servers that are not free farming.

1. Get tag when BD spawns.

One of the best ways to ensure a quick BD kill or an easy BD contest is to ensure that your raid gets tag.
Having multiple players glide out from a high point and grabbing tag at spawn when the boss just spawned (and is still flying) is the best way to get tag. Have players mount on wyverns and use rocket gliders and stay mid air. Those players can rocket stun opponents that are also trying to get aggro as well.

Having Dragons flying around BD spawn is also very helpful, because they can use Dragon Roar to drop opponents that are on gliders trying to contest or get tag.

2. Siege Tanks are your best damage source.

Apparently Siege Damage isn’t good on BD anymore. I heard Risopodas are also not that good as they were before.

While a strong raid can simply DPS the boss down with their damage, it quickly get difficult to do so if BD gets berserk. When BD is getting multiple berserk stacks, it is still possible to kill the boss, because of the recent additions to the game. Siege Tanks and Beetle attacks completely ignore BD berserk stacks. Actively using those will eventually let the attempting raid eventually kill the boss even if there are multiple berserk stacks.

This means, as a contesting raid, having 5 or 6 berserk stacks on Black Dragon doesn’t mean Black Dragon won’t end up dying that day. Don’t be a cocky cunt and always be wary that Black Dragon can actually die.

This means the contesting raid needs to always focus on destroying enemy siege tanks. The contesting side spawning their own tanks can actually hurt the contesting side depending on how the attempting raid reacts. If the contesting side cannot control their own tanks, the attempting raid will just drive the contester’s tanks into BD and use it to DPS the boss.

Having multiple beetles also helps killing the boss significantly. To contest this, you need all of your archers using Basic Missile Rain to kill the beetles as well as having players to spec Gunslinger’s Collateral Damage to quickly destroy tanks.

3. Resetting Black Dragon is not easy.

While many of you might think the opposite, if the attempting raid has a significantly stronger raid, it is very difficult to reset Black Dragon. Hear me out. There are two ways to reset BD: grab aggro and drive it outside of its zone, or to wipe the enemy raid and have everyone in the raid to drop aggro. The latter option is difficult to achieve if the enemy raid is strong. This also gets even more difficult when there are multiple siege tanks spawned.

If the contesting raid grabs aggro when the boss has less than 60% of its HP, the contesting raid must almost always work on resetting the boss.

Shit can likely go south up to the point that you won’t be able to reset the boss and eventually the more determined attempting raid will whittle the boss down with siege tanks and beetles.

4. Hero Respawns is the most powerful addition for the attempting raid.

Since the addition to Hero Respawns, it is much more easier for the attempting raid to kill BD. Not to mention the addition of beetles and the buff to siege tanks makes killing BD really a joke. Don’t waste your hero respawns on a petty Jola, Meina, Glenn. Use it for Black Dragon. Obviously over time, the heroes will know how many they will need to spare for Black Dragon.

5. Enable “Double-Tap Jump to Deploy Glider” for Smash Earth.

Dodging Smash Earth pattern with a jump can be finicky.

There are times you won’t have much time to react when Smash Earth happens.
By enabling this setting, you can easily dodge the boss pattern. Just make sure you’re away from other people because you can get knocked out of your glider by other players.

TL; DR

It is much more easier for the attempting raid to kill Black Dragon with the addition of Hero Respawns, Beetles, and Siege Tank buffs.

The attempting raid must always prioritize on the patterns and focus on DPSing the boss with siege tanks. (At least when the boss has multiple berserk stacks.) Prioritize on keeping boss aggro and having it stay at the center. Zombie rush into the boss to eventually whittle it down.

The contesting raid must always prioritize on resetting the boss whenever they can. The boss literally doesn’t regen, so a brain dead faction with a fuck ton of bodies and beetles and tanks can literally zombie rush the boss to death even with zero gear.

[3/5/2020] The Ipnysh Sanctuary

Formally known as the “Erenor Golden Shrine”.

Intro:

Despite Kakao Games buying out XL, XL told us that they will still get to keep their right of management to do whatever they want with Archeage. As a result KR Archeage will still be getting monthly updates & live services.

KR Archeage is getting a new dungeon (and a PC cafe exclusive chill dungeon) as well as new Dungeon gears called (Shabbat Weapon/Armor) [안식의 무기/방어구] that can be considered as T3 Library gear.

Plus, KR Archeage is getting House Fairies that alleviates the pain of having to constantly farm & potato.

Erenor Golden Shrine [이프니르의 황금 성소]:

There was an old city named Erenor built by the continent’s most advanced civilization. The Ipnysh [이프나] race that lived there eventually vanished by living within the Elves and Human civilization.

Respawn location.

So basically we’re tomb raiders going through the Erenor Golden Shrine dungeon to get our shiny T3 lib gear.

My prediction is that the new dungeon will feel like Serpentis with Noryette difficulty. Personally sounds pretty interesting.

Some more cool images.

This is the final boss in the dungeon. Looks pretty bad ass and reminds me of some bosses you can fight against in Diablo 3. Looking at his hands, maybe it could shoot lasers like the 4th boss in Library?

This is a 5 man dungeon by the way.

New Dungeon Gear:

Dope new gear.

In the new dungeon introduced above, you can either get the Shabbat (T3 Library) gear from loot by chance or you can either awaken your existing T2 Library gear in to it. You get to keep the Gear Type levels while awakening.

Shabbat Leather Gear.

The materials necessary for awakening T2 gears into Shabbat gear can be obtained within this dungeon by killing the boss mobs and can also be obtained by running dailies (Probably the same way how current T2 awakening is).

Took a while to edit it.

There were a lot of complaints in KR that Lib gear was shitty, cuz it is too expensive compared to Hiram. Hiram gear became so easy to gear up since the Garden patch, but Library gear was left the same.

As a result, in addition to introducing this new Shabbot gear, synthesizing existing lower tier dungeon gear will become about 20~30% cheaper.

Shabbot gear also won’t cost too much, because tons of KR players were complaining that gearing Dungeon gear was too expensive compared to Hiram gear.

Downsides:

It’s probably unintended, but consider a scenario where you have 5 pieces of T2 Library gear for your 5 set library effect. You farmed your ass out to awaken one of your T2 Library piece to Shabbot gear. Guess what? You lose your 5 set effect, because technically the Shabbot gear is not a T3 Library gear; it is just a gear that can be awakened from T2 Library gear. So while you are gearing up, you would be playing without your library set effects until you awaken those T2 Library gears.

This also applies to your Abyssal Lunafrosts. Probably a bug as well, but there are reports where Abyssal Lunafrosts set effects not stacking with each other. Say the 5 set Lunafrost effect gives you crit rate increase. if you have 4 Lunafrosts on your T2 gear and 1 Lunafrost on your Shabbot gear, it won’t be considered that you have 5 Abyssal Lunafrosts.

House Fairies:

Dobby is not free.

KR Archeage is now getting House Fairies that would automatically plant and harvest your farms.

You can assign your House Fairy on to a house and it will cost 20 Tax Certificates (at least in this example).

This addition is intended to resolve housing problems where players do not have enough land.

Fairies seem to have a labor pool which is can spend on given specific tasks. It can equip Vocation gear which seems to give you bonus effects. House Fairies also have their own proficiency which reduces the amount of labor the House Fairy would spend on given task.

The example above shows you that you can assign a House Fairy on your existing land, but the patch note mentions that House Fairies can only be assigned on specialized farms designed for these fairies and if you have spare designs that are not used, you can assign those fairies to those designs the the fairies will work on behalf of you. The efficiency seems to be lower than you manually harvesting.

The image above shows you how to assign spare building designs so that the house fairies can use the farm designs to produce goods. Potatoing this way takes longer than and gives you less goodies, but it will still work even if you are offline. The higher level your fairies become, the more spare designs you can assign to your fairies, thus the more yield you will get.

The max labor the fairy can hold also increases so you can AFK longer. Fairies are account bind, but can move to different characters. (One account can have multiple characters right?) The labor the fairy uses is from the server labor pool. Fairies don’t pay tax certificates, but have to pay something called a “Production cost” which probably is a set limit on how much a player can get yields out of a fairy. This amount is recharged every week for free, but can also be bought (Probably through the Credit Shop).

Re-charging Production Cost.

In the future, the devs intend to expand the type of activities the fairies can automate on behalf of you.

It is yet to be confirmed, but I would predict that these House Fairies are attachable on existing house plots, but users will be able to give extra farm/house designs to the fairy so that it can basically get free “virtual” land to plant and harvest things.

PC Cafe Exclusive Dungeon:

A PC Cafe exclusive dungeon called “Mo-Oh’s Bizarre Dreamland” dungeon is added. Multiple players can join the dungeon together. Seems like there’s a daily for this dungeon. (You can see the daily quest tag below.)

The NPC that gives you the quest.

This dungeon isn’t intended to be difficult and is a more relaxing dungeon that doesn’t rely on the player’s gear score and level. The play style is similar to the 1 man solo co-op dungeon (Upcoming dungeon called Hereafter Rebellion) [저승의 밤]. You can still get goodies only obtainable from the Credit Shop even if you only spend a bit of time.

Playthrough

Improved Trade Route:

Trade Routes on the East got improved even more.

ez trade runs.

Finally there is a new route that connects Hasla and Rokhala, Hasla trade runs will become easier than before.

Location.

Random Other Stuff:

Car Changes

Timber Coupe recipes have changed and they added several more tiers. T2 and T2 Timber Coupe does not have slots to put packs.

Honor Luna Charms

Archeage lets you either get T1 ~ T3 Lunagems by gathering materials, but also lets you go through the Luna Charm route. In Legacy, not many players went Luna Charms, because the stats were inferior to Lunagems. In Unchained, lots of players still don’t go for it, because it costs a lot of honor and doesn’t even give you the best stats. Now Luna Charm gets a +6 upgrade which basically makes the Luna Charms as good as the traditional Lunagems.

Territory Income

Get ready boiz. Erenor Heros can now manage how much territory income will be split between players and heroes. Now Heroes can set the amount of pool the heroes will get out of the territory income pool (Maximum is 30%). If 30% is set, 6 heros of the faction gets a split out of the 30% of the total territory income from that territory.

Heroes also can give contribution points to other players in the raid. This is intended to help players who contribute a lot to the faction, but cannot make it to potato territory content. (Probably catering for the content raid that goes through an ass of a day while the potato raid goes through reset dailies.)

Incoming Faction Hero drama!!!

De-Pirating

RNG to even leave Pirate faction LOLOL

Your words have been heard. Now Pirates can de-pirate whenever. It costs a lot to de-pirate, but every week up to 5 players can leave the Pirate faction. There’s also a chance to fail on leaving the faction. If you fail to leave the faction, you get some of the cost you spent to leave the faction, but you can only attempt to leave again the next week. De-pirating is exempt from the Exiles cooldown.

Faction Score Balance

None of yall listened to me that you can easily manipulate the faction score, but this is a thing in Korea that is being abused even today. XL is going to balance it soon and obviously not tell us what they changed.

Some Garden (KR Unchained) Server changes

Ain’t nobody care about this stuff.

Cargo Ferry changes

I ain’t no potato and I personally believe the Cargo Ferry needs to go away so yeah only rough translations for this.

It’s basically addressing the issue where people were not able to sit on the cargo ferry’s chairs or hang on the ladders due to having too much people on it. Maybe trolls were putting alts on the chairs and ladders? Anyway people actually with packs weren’t able to get on those to safely travel through the sea, thus the developers will soon figure out a solution to this.