Equipment Subtype Levels

Previously known as Gear Specialization Levels

So… I’ve done snippets of translations regarding the Garden update which includes the new Gear Specialization feature, but this is some details explanation with numbers involved ๐Ÿ˜ƒ I’ve been calling this Gear Specialization Levels before, but umm Gamigo decided to call it Equipment Subtype Levels so I’ll call it that way from now on.

Intro

XL released the Garden Update a while ago and it is the update which NA/EU will be getting next. The Garden patch is probably one of XL’s most ambitious patches ever, since it introduces a cross server region.

Apart from introducing a new region, they also added new tiers for Hiram gear and Erenor gear! Hiram gets T5 (Exalted) and Erenor gets T3 (Brilliant). (After the Garden Patch, yall would’ve noticed that Library now got T3 as well.)

Unlike the T3 Library gear that is added later into the game, T5 Hiram and T3 Erenor doesn’t really get much of a buff in stats or damage initially. The cool thing though is that T5 Hiram, T3 Erenor, T2 Library gear all gets a new feature called Equipment Subtype. This applies to both Weapon and Armor.

Basically these extra levels increases your gear’s strength against its counterparts. For example, if you level up your bow’s subtype level, the bow will hit harder against cloth players. If you level up your cloth gear’s subtype level, bow attacks will basically hurt less.

At level 10, it has been reported that you would have a DPS increase of 10~20%. Not sure how much armor levels would affect that yet, since these were tests users did by themselves.

Max Levels for each Gear Type

Each gear all have different max enhancement level it can reach and here are the following: (I don’t know what the levels for T3 Library weapons will be. Tbh, no one should use it anyway.)

XL mentioned eventually players will be able to max level up the enhancement level for the gears that don’t go up to 4, 10 (mythic, eternal respectively)

Gear

Weapon

Armor

Mythic

Eternal

Mythic

Eternal

T5 Hiram

4

10

2

5

T3 Erenor

4

10

2

5

T2 RD

4

2

T1 Levi

T1 Charybdis

T2 Lib

T3 Lib (Immortal Warden)

TBD

TBD

2

5

T2 BD

4

10

2

5

T2 Levi

T2 Charybdis

T2 Anthalon

Leveling Tab UI

Imagine Feeding Eternal Erenor Infusions ๐Ÿคฎ

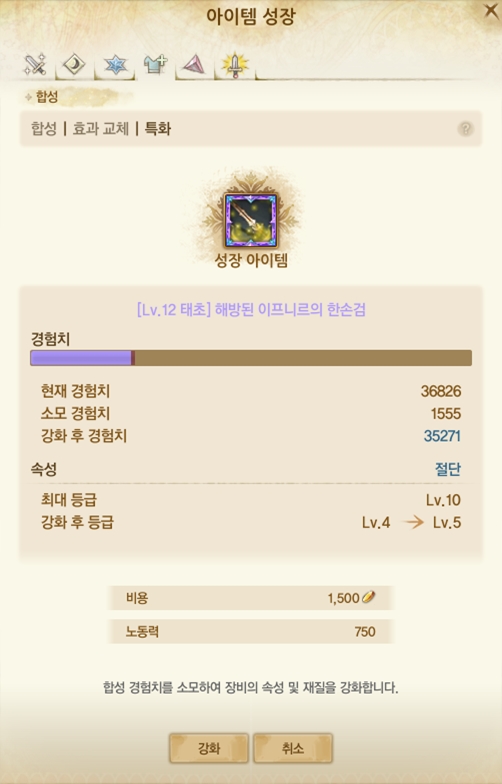
Leveling Gear Specialization Levels require you to consume existing experience points from your gear. You can’t feed experience in a way it will lower your gear’s item grade (Eternal -> Mythic), so you will have to feed Eternal Erenor Infusions to your Eternal Erenor gear or Mythic Erenor Infusions to your Mythic Erenors. Uhh…. Good luck with that. You can always feed staves and shit if you can afford it.

Luckily for Hiram and Library gear, you can just feed the gear with existing infusions into your gear. The catch is that it requires way more experience than Erenor.

Damage Type VS Armor Type

Attack Speeds are written in parenthesis. The damage type for each weapon are the following:

  • Piercing: Bow(1.0)
  • Slashing: Dagger(0.8), Sword(1.0), Katana(1.0), Nodachi(1.1), Greatsword(1.1), Shortspear(1.1), Longspear(1.2)
  • Crushing: Axe(1.1), Greataxe(1.2)
  • Blasting: Sceptor(1.0), Staff(1.3)
  • Bludgeoning: Club(1.2), Greatclub(1.3)
Armor TypeSlashingCrushingBludgeoningBlastingPiercing
ClothLowNoneMedium HighNoneHigh
LeatherHighMediumMedium LowLowNone
PlateNoneMediumNoneHighLow
The bludgeoning type and blasting type is newly added.

Clubs and Greatclubs have bludgeoning damage/heal type which means it will heal players that are wearing Cloth and Leather more, but not for players wearing Plate.

Erenor Required EXP per Level

Here’s the required amount of EXP per each Level for Erenor. It is the same for both Mythic and Erenor.

Weapon:

  1. 311
  2. 622
  3. 933
  4. 1244
  5. 1555
  6. 1866
  7. 2177
  8. 2488
  9. 2799
  10. 3110

Total EXP: 17105.

Armor:

  1. 233
  2. 466
  3. 699
  4. 932
  5. 1165

Total EXP: 3495.

The amount of gold required to leveling up varies. It’s hard to find exact numbers, because no one cared to post it, but it seems like the cost ranges from the hundreds to the thousands. I don’t have info about the exact numbers for the labor cost and gold cost, but I mean if you’re aiming to level up Erenor gear, the amount of labor and gold required for each level are the least of your concerns.

It’s pretty difficult to take advantage of leveling up an existing Erenor gear at Mythic up to 4 (since that is the max level at Mythic) and then synthesizing it to Eternal to max it to level 10, because – uhh… – it’s pricey to get a Mythic Erenor at high exp %, but if you are able to achieve that, you can save some gold by doing so.

Basically if you take the staff route to level up Erenor gear, after feeding 6 leggy staves, awaken the Erenor to T3. Level 2 of your subtype levels. Feed Mythic Erenor crate exp/Mythic staves/Mythic crafted infusions and aim to roll over 2796 mythic exp so that you can use mythic exp to level your gear all the way to level 5.

Hiram Required EXP per Level

I got this info from KR inven: http://m.inven.co.kr/board/archeage/2836/279641
Here are the EXP required for Hiram at each level.

Level

Weapon

Armor

EXP

Labor

Gold

EXP

Labor

Gold

1

372,339

550

500

219,484

220

250

2

744,678

600

750

438,968

240

375

3

1,117,017

650

1,000

658,452

260

500

4

1,489,356

700

1,250

877,936

280

625

5

1,861,695

750

1,500

1,097,420

300

750

6

2,234,034

800

1,750

7

2,606,373

850

2,000

8

2,978,712

900

2,250

9

3,351,051

950

2,500

10

3,723,390

1,000

2,750

Total

20,478,645

7,750

16,250

3,292,260

1,300

2,500

Immortal Warden Required EXP per Level

Got this from KR inven as well:
http://m.inven.co.kr/board/archeage/2641/13961
Here are the EXP required for Immortal Warden at each level

Level

Weapon

Armor

EXP

Labor

Gold

EXP

Labor

Gold

1

TBD

TBD

TBD

109,473

220

250

2

TBD

TBD

TBD

218,946

240

375

3

TBD

TBD

TBD

328,419

260

500

4

TBD

TBD

TBD

437,892

280

625

5

TBD

TBD

TBD

547,365

300

750

6

TBD

TBD

TBD

7

TBD

TBD

TBD

8

TBD

TBD

TBD

9

TBD

TBD

TBD

10

TBD

TBD

TBD

Total

TBD

TBD

TBD

1,642,095

1,300

2,500

Quick Facts

  • The EXP required for 1H is equivalent to a 2H.
  • Armor pieces cost the same regardless of what piece it is. (The amount of GS you gain per piece are different though.) For example, a chest piece gain more GS than a glove piece.
  • Leveling a gear from 1 to 2 is the same as leveling a gear from 4 to 5, leveling each of your gear one by one instead of trying to max level 1 piece at a time.
  • Level up Weapon first or Armor first? WEAPON FIRST. There’s a bunch of explanation here: http://www.inven.co.kr/board/archeage/2641/13886
    I’m lazy so just believe me. For healers who overheal, sure, go for armor first.
  • Apart from the static cost for leveling, The amount of exp consumed also costs you gold. For Immortal Warden gear, from level 1~5, it will roughly cost you 10k gold for each piece. The cost varies depending on the type of gear. (Eg. Costs more for chest piece.)

Black Dragon Patterns

So Black Dragon finally died in NA a couple times. Here are some detailed descriptions explaining about Black Dragon’s pattern and how to kill it or either contest it.

I felt like posting this, since it’s been a while since Black Dragon came out and I think I waited long enough for it to be available for everyone. I mean, it’s not really that of a secret information. Y’all can figure it out yourselves too.

Before I start, take note that (ํ•œ๊ธ€) shows the Korean name of the spell. This post might not be 100% accurate, but it’s safe to say this post would be helpful to a lot of you guys.

Patterns

Every 10% Boss HP triggers a pattern like the Scale Pattern or the Spirit Pattern. Before Boss starts, take Defense or Auramancy as they make you tankier and prevents you from getting one shotted easily.

The following spells are recommended to take.

  • Defense: Redoubt (Life), Revitalizing Cheer (Life), Invincibility (It helps out, but not necessary.)
  • Auramancy: Thwart (Mist/Stone), Shrug it off
  • Movement spells. (Helpful when slowed.)

Spell Patterns

1. Typhoon Wings (ํƒœํ’์˜ ๋‚ ๊ฐœ)

Pushes everyone away from the boss. Before casting ends, use Redoubt, Revitalizing Cheer. Invulnerable Gliders also prevent you from getting pushed away, but it is best to save this last since you want to use it when you are about to die.

One important maneuver is to place yourself so that you don’t have flame mats behind you. This helps a lot because whenever you get tripped or pushed back, you might get pushed into those flame mats if they are behind you.

2. Black Dragon Scale (๊ฒ€์€์šฉ์˜ ๋น„๋Š˜) AKA. Scale Pattern

BD flies up and drops scales for a long time during cast time. Go to the dropped scales and harvest them. Once harvested, the harvester will automatically use a spell to protect up to 10 people around himself against the boss’s nuke spell that follows up.

One important thing to know is that the Harvesters must not stay close with other harvesters, because the buff goes away once they get close to each other. (Stay about 10~15m away.)

If you are contesting the Black Dragon, this pattern is the 2nd best pattern for your raid to go in. You’ll want to steal the scales to prevent the enemy raid from collecting those scales themselves.

You can harvest a scale and then go to an opposite faction player that harvested a scale to cancel their buff.

3. Smash Earth (๋Œ€์ง€ ๊ฐ•ํƒ€)

BD jumps slightly and slams the ground. You gotta glide or jump when the cast time ends. Jump at around 80% (or when you see BD coming down) of its cast time or stay glided. Even with decent gear and 40k+ HP, it’ll probably hurt you a lot, but you can easily dodge this attack!

Have multiple people calling out the pattern, so that the raid always knows that this pattern is coming.

4. Terrifying Roar (ํฌํšจ)

A very large AOE skill. Dragon deals nuke damage on people far away (Up to about 140m). This spell also stun everyone nearby the boss for about 6 seconds. There’s nothing much you can really do to counter this apart from Invuln gliding/mounting. This spell doesn’t usually hurt you much unless the boss gets stacks.

5. Lasso (๋‹น๊ธฐ๊ธฐ)

Lassos everyone close by towards the boss. Once lassoed the boss deals damage at the middle. You can use Shrug it Off to cancel lasso, but you will still take the damage. This damage is only lethal when BD gains stacks.

6. Penetrating Dark Energy (๊ฒ€์€ ๊ธฐ์šด์˜ ์ž ์‹) AKA. Spirit Pattern

BD casts this spell and, after a couple seconds, unkillable spirit mobs spawn that move towards the boss. Every mob that makes it to BD gives a stack of the Devilish Contract buff. Each stack increases BD’s atk & def by 10%. This stack makes those non-lethal Lasso and Terrifying Roars lethal.

When this pattern starts, some raid members will get some black cloud on themselves. Those players can “kill” the black ghosts by going close to them. This black cloud only spawns to players in the raid that has boss aggro.

The Black cloud only spawns to the members in the raid that has BD aggro, so it is crucial to keep or steal the boss aggro.

This is the best pattern for the contesting raid to go in and kill the people with the black clouds.

THIS IS THE MOST IMPORTANT THING THOSE PEOPLE SHOULD BE DOING.

7. Sunder Earth (๋Œ€์ง€ ๊ฐ€๋ฅด๊ธฐ)

BD spawns an arc of blue mat in front of itself and then BD moves its right leg. After that BD deals damage on where the mat was. Just stay behind the Dragon’s legs (away from those mats) and you are fine.

8. Dark Energy Explosion (Black Bubble Pattern) (๊ฒ€์€์šฉ์˜ ์นจ๋ฌต/๊นƒํ„ธ ํŒจํ„ด)

Boss flies up in the sky and stays there channeling. Everyone gets silenced. The only way to deal damage is to go into the Black Bubble that spawns around which gives you a casting spell and attack BD that way. When the casting ends, BD will deal nuke damage. It’s ideal if you can dodge this damage.

This pattern seems to only happen once the boss’ HP gets pretty low.

Non Spell Patterns

Spin

Standard attack. Just stay behind its leg.

Meteor

Spawns meteors. Ground will have red mat where meteors fall. Use Sonic Wave to remove burning debuff <Verify this>. Actually does have a very short cast time. (Probably like 10ms?) To reduce getting hit by meteor, your back shouldn’t be facing a fire mat because boss patterns will push you back and trip you into those fire mats.

Tremor

Uses its right leg to deal damage outwards to 5 directions.

Run Forwards

Just runs forward and then turns. EVERYONE should get behind to the boss by the time it turns. Mount up or glide up.

Fly Forwards

Takes off and flies forwards. EVERYONE should get behind to the boss by the time it turns. Mount up or glide up.

Fire Breath

Does a Fire Breath in front of the boss. Only the Tank should be at the front.

Fireball

One Fireball in front. If it hits a target, it spreads. Usually the tank that has the aggro is hit by this, so it is important for the tank to stay in front alone.

Sunder Earth behind

BD sometimes turns back and uses Sunder Earth type of skill without casting. Staying on each legs is crucial to avoid getting hit.

Good to know

Boss flies around. Always need to stay behind the boss so you have to follow the boss. Keeping Devilish Contract stack low is the most important. With high stacks, even normal hits will wipe a whole raid.

To contest BD, the best pattern to wait is the collecting Black Dragon Scale phase, or during the Penetrating Dark Energy phase, or Black Bubble phase. At 60% BD seems to get into hp regen phase. At 5% BD gains a lot of dmg/def. BD gains Frenzy once it gains enough stacks of Devilish Contract.

Honestly, if you are contesting, just make everyone go for CC tank specs and go in whenever BD does one of the major patterns. Your damage is going to be piss poor compared to BD’s skill damage anyway. Basically, once you see the BD’s hp dropping every 10% run in with an invulnerable mount and start spamming fortress, imprisons, bubbles, stillness, hell spears and the opponents should eventually get wiped by the Black Dragon’s pattern.

The advantage of doing this is that you can contest the opponent even if you have rebirth, since all you need to do is put CCs on the opponents that are under the boss.

Pattern Order

The Black Dragon 10% patterns aren’t entirely random.

Patterns that happen every 10%:

  • 90% Penetrating Dark Energy
  • 80% Black Dragon Scale
  • 70% Penetrating Dark Energy
  • 60% Dark Energy Explosion
  • 60%~0% Randomly triggers “Penetrating Dark Energy”
  • 50% Black Dragon Scale
  • 40% No Pattern
  • 30% Dark Energy Explosion
  • 20% Black Dragon Scale
  • 10% Dark Energy Explosion
  • 5% Berserk (Regen)

Contesting using the Aggro Reset Glitch

You can easily contest the Black Dragon using the Aggro reset glitch using sleep Witchcraft skills. Spec into “Focal Concussion”. Go into the boss using an invuln mount. Hit the boss once and use Focal Concussion on the Black Dragon’s main aggro. This causes the attempting raid problems, because the main tank will not be the main aggro anymore. Healers will have problems healing the new main aggro, thus the raid easily wipes.

Assign a couple players to do this during a pattern to maximize it’s effectiveness.

Focal Concussion is banned from being used to contest bosses, so don’t do it. It’ll get fixed in upcoming patches anyway.

FOCAL CONCUSSION & NODACHI MECHANISM GOT CHANGED. NO LONGER VALID.

Advanced Knowledge

The following info will only matter to servers that are not free farming.

1. Get tag when BD spawns.

One of the best ways to ensure a quick BD kill or an easy BD contest is to ensure that your raid gets tag.
Having multiple players glide out from a high point and grabbing tag at spawn when the boss just spawned (and is still flying) is the best way to get tag. Have players mount on wyverns and use rocket gliders and stay mid air. Those players can rocket stun opponents that are also trying to get aggro as well.

Having Dragons flying around BD spawn is also very helpful, because they can use Dragon Roar to drop opponents that are on gliders trying to contest or get tag.

2. Siege Tanks are your best damage source.

While a strong raid can simply DPS the boss down with their damage, it quickly get difficult to do so if BD gets berserk. When BD is getting multiple berserk stacks, it is still possible to kill the boss, because of the recent additions to the game. Siege Tanks and Beetle attacks completely ignore BD berserk stacks. Actively using those will eventually let the attempting raid eventually kill the boss even if there are multiple berserk stacks.

This means, as a contesting raid, having 5 or 6 berserk stacks on Black Dragon doesn’t mean Black Dragon won’t end up dying that day. Don’t be a cocky cunt and always be wary that Black Dragon can actually die.

This means the contesting raid needs to always focus on destroying enemy siege tanks. The contesting side spawning their own tanks can actually hurt the contesting side depending on how the attempting raid reacts. If the contesting side cannot control their own tanks, the attempting raid will just drive the contester’s tanks into BD and use it to DPS the boss.

Having multiple beetles also helps killing the boss significantly. To contest this, you need all of your archers using Basic Missile Rain to kill the beetles as well as having players to spec Gunslinger’s Collateral Damage to quickly destroy tanks.

3. Resetting Black Dragon is not easy.

While many of you might think the opposite, if the attempting raid has a significantly stronger raid, it is very difficult to reset Black Dragon. Hear me out. There are two ways to reset BD: grab aggro and drive it outside of its zone, or to wipe the enemy raid and have everyone in the raid to drop aggro. The latter option is difficult to achieve if the enemy raid is strong. This also gets even more difficult when there are multiple siege tanks spawned.

If the contesting raid grabs aggro when the boss has less than 60% of its HP, the contesting raid must almost always work on resetting the boss.

Shit can likely go south up to the point that you won’t be able to reset the boss and eventually the more determined attempting raid will whittle the boss down with siege tanks and beetles.

4. Hero Respawns is the most powerful addition for the attempting raid.

Since the addition to Hero Respawns, it is much more easier for the attempting raid to kill BD. Not to mention the addition of beetles and the buff to siege tanks makes killing BD really a joke. Don’t waste your hero respawns on a petty Jola, Meina, Glenn. Use it for Black Dragon. Obviously over time, the heroes will know how many they will need to spare for Black Dragon.

5. TL; DR

It is much more easier for the attempting raid to kill Black Dragon with the addition of Hero Respawns, Beetles, and Siege Tank buffs.

The attempting raid must always prioritize on the patterns and focus on DPSing the boss with siege tanks. (At least when the boss has multiple berserk stacks.) Prioritize on keeping boss aggro and having it stay at the center. Zombie rush into the boss to eventually whittle it down.

The contesting raid must always prioritize on resetting the boss whenever they can. The boss literally doesn’t regen, so a brain dead faction with a fuck ton of bodies and beetles and tanks can literally zombie rush the boss to death even with zero gear.